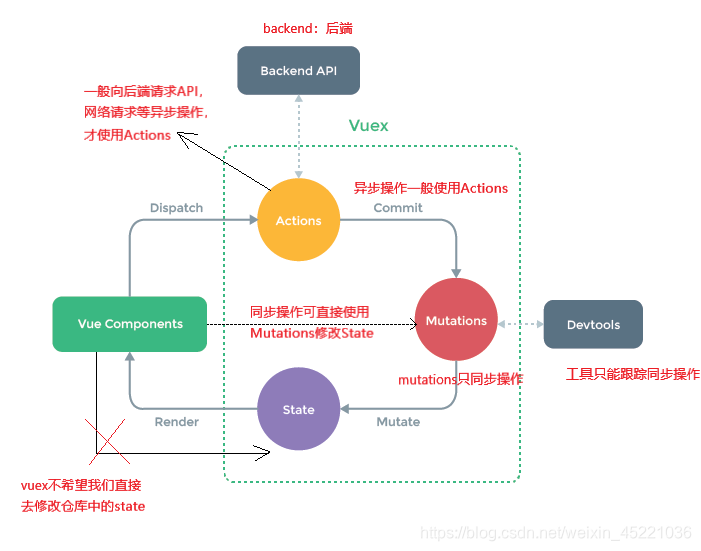
# VUEX
# 一、Vuex的概念和作用解析
# 1】官方解释:
Vuex是一个专为Vue.js应用程序开发的状态管理模式
- 它采用集中式存储管理应用我的所有组件的状态,并以相应的规则保证状态以一种可预测的方式发生变化。
Vuex也集成到Vue的官方调试工具devtools extension,提供了诸如零配置的time-travel调试、状态快照导入导出等高级调试功能。
# 2】状态管理到底是什么
- 状态管理模式、集中式存储管理,听起来很复杂
- 其实,你可以简单的将其看成把需要多个组件共享的变量全部储存在一个对象里面。
- 然后,将这个对象放在顶层的
Vue实例中,让其他组件可以使用。 - 那么,多个组件是不是就可以共享这个对象中的所有变量属性了呢?肯定不是
- 如果我们自己封装一个对象来管理不能保证它里面的所有的属性做到响应式。
- 比如:类似于
VUE实例中的data是响应式的,因为vue封装了数据双向绑定的set和get,同理这里状态管理也是如此 - 所有
Vuex就是为了提供这样一个在多个组件间共享状态的插件。
# 3】有什么状态是需要我们在多个组件间共享的
- 比如用户的登录状态、用户名称、头像、地理位置信息等等
- 比如商城的收藏、购物车中的物品等等
- 这些状态信息,我们都可以放在统一的地方,对它进行保存和管理,而且它们还是响应式的

# 二、Vuex基本使用
单界面到多界面状态管理切换
全局单例模式(大管家)
我们现在要做的就是将共享的状态抽取出来,交给我们的大管家,统一进行管理。之后你们每个视图,按照我规定好的规定,进行访问和修改等操作($store.state.xxx)。这就是Vuex背后的基本思想了。
# 1】安装vuex
npm install vuex --save
# 2】使用vuex
在src文件夹下创建store文件夹(仓库)在新建index.js来配置Vuex(类似VueRouter的使用步骤)
import Vue from 'vue'
import Vuex from 'vuex'

//1.安装插件
Vue.use(Vuex)

//2.创建store对象
const store=new Vuex.Store({
    state:{
	//状态
    },
    mutations:{
	//同步操作修改状态,使用devtools跟踪
    },
    actions:{
	//异步操作修改状态
    },
    getters:{

    },
    modules:{

    }

})

//3.导出store对象
export default store

//4.在main.js中挂载store
import Vue from 'vue'
import App from './App'
import store from './store'

Vue.config.productionTip = false

/* eslint-disable no-new */
new Vue({
  el: '#app',
  store,//这里挂载,内部会执行Vue.prototype.$store=store
  render: h => h(App)
})
# 三、Vuex-mutations
VueComponents ----commit---->Mutations ----mutate---->state
①在index.js中配置vuex的mutations
const store=new Vuex.Store({
    state:{
        counter:1000
	//状态
    },
    mutations:{
	//方法
        increment(state){
            state.counter++
        },
        decrement(state){
            state.counter--
        }

    },
    actions:{
	//异步操作修改状态
    },
    getters:{

    },
    modules:{

    }

})
②$store.commit('mutations中的方法')
<button @click="$store.commit('increment')">+</button>
   <button @click="$store.commit('decrement')">-</button>
<!--在组件使用Vuex中的全局变量$store获取vuex配置的东西,在组件中使用大管家store中的mutations定义的方法-->
<!--此时使用$store.commit('mutations中定义的方法名')来使用-->
# 四、Vuex单一状态树的理解

# 1】vuex提出单一状态树
Single Source of Truth(也可翻译成单一数据源)
- 如果你的状态信息是保存到多个
Store对象中的,那么之后的管理和维护等等都会变得特别困难 - 所以
Vuex也使用了单一状态树来管理应用层级的全部状态 - 单一状态树能够让我们最直接的方式找到某个状态的片段,而且在之后的维护和调试过程中,也可以非常方便的管理和维护
- 所以只使用唯一
store实例来管理
# 五、Getters的使用详解
有时候,我们需要从store中获取一些state变异后的状态(类似于VUE实例中的computed属性对data中的变量进行修改)
①在index中的getters属性对state中的变量进行变异修改:
getters属性中定义的方法的参数是被规定好了的:
方法名(参数一,参数二){return xxx} 其中**'参数一'是指state对象,'参数二'是指getters对象**(第二个参数非必选)
(JavaScript中函数返回类型决定函数是什么类型的)
const store=new Vuex.Store({
state:{
        counter:1000,
        students:[
            {id:110,name:'lh',age:10},
            {id:120,name:'zs',age:11},
            {id:119,name:'ls',age:22},
            {id:122,name:'ww',age:21}]
    },
getters:{
    powerCounter(state){
        return state.counter * state.counter
    },
    more20stu(state){//1.正常基本使用getters
        return state.students.filter(s => s.age >= 20)
    },
    more20stuNum(state,getters){//2.当getters作为参数使用也必须传入state
        return getters.more20stu.lengt
    },
    moreAgeStu(state){//3.需要向getters中的方法传入参数时需要先return一个function
        return function(age){
            return state.students.filter(s => s.age >= age)
        }
    }
}
})
②在组件中进行使用$store.getters.xxx获取状态信息
<h2>{{$store.getters.powerCounter}}</h2>
<h2>{{$store.getters.more20stu}}</h2>
<h2>{{$store.getters.more20stuNum}}</h2>
<h2>{{$store.getters.moreAgeStu(11)}}</h2>
# 六、Vue-mutations的携带参数
# 1】Mutation状态更新
Vuex的store状态的更新唯一方式:提交Mutation
# Mutation主要包括两部分:
- 字符串的事件类型(
type) - 一个回调函数(
handler),规定该回调函数的第一个参数就是state
# Mutation的定义方式:
mutations:{
increment(state){
    state.counter++
}
}
# 通过Mutation更新:
increment: function(){
    this.$store.commit('increment')
}
# 2】Mutation传递参数
在通过mutation更新数据的时候,有可能我们希望携带一些额外的参数,参数被称为是mutation的载荷(payload)
如果我们需要很多参数需要传递,这时候我们会以对象的形式传递,也就是payload是一个对象,再从对象中取出相关的信息。
# Mutation的定义方式:
mutations:{
        increment(state){
            state.counter++
        },
        decrement(state){
            state.counter--
        },
        incrementCount(state,count){
            //count:payload载荷
            state.counter=state.counter+count
        },
        addStudent(state,stu){//如果需要传递多个参数只需要把参数看作一个对象
            state.students.push(stu)
        }
    }
# 通过Mutation更新:
<button @click="$store.commit('increment')">+</button>
<button @click="$store.commit('decrement')">-</button>
<button @click="$store.commit('incrementCount',5)">+5</button>
<button @click="$store.commit('incrementCount',10)">+10</button>
<button @click="$store.commit('addStudent',{id:200,name:'james',age:30})">添加学生</button>
# 3】使用 mapMutations 辅助函数
你可以在组件中使用 this.$store.commit('xxx') 提交 mutation,或者使用 mapMutations 辅助函数将组件中的 methods 映射为 store.commit 调用(需要在根节点注入 store)。
import { mapMutations } from 'vuex'

export default {
  // ...
  methods: {
    ...mapMutations([
      'increment', // 将 `this.increment()` 映射为 `this.$store.commit('increment')`

      // `mapMutations` 也支持载荷:
      'incrementBy' // 将 `this.incrementBy(amount)` 映射为 `this.$store.commit('incrementBy', amount)`
    ]),
    ...mapMutations({
      add: 'increment' // 将 `this.add()` 映射为 `this.$store.commit('increment')`
    })
  }
}
# 七、Mutation提交风格
上面的通过commit进行提交时一种普通的方式:方面名后面只能再跟传递唯一参数(这个参数可以是普通变量也可以是对象)
Vue还提供了另一种风格,它是一个包含type属性的对象(这个对象中除开type,剩下的部分整体组成一个payload对象)
<!--普通的提交风格-->
<button @click="$store.commit('incrementCount',5)">+5</button>
<!--特殊的提交风格-->
<button @click="$store.commit({type:'incrementCount',age:10,name:xx,id:100)}">+5</button>
使用特殊的对象风格提交,相当于就是将整个对象提交了,然后vuex再去找到对象中的type去配置中匹配,对象中后面的所有参数就是一个payload对象传递到mutations中,然后再使用payload.age来使用。
//mutations中的处理方式
changeCount(state,payload){
    state.count = payload.age + payload.name + payload.id
}
# 八、Vuex数据的响应式原理
# 1】Mutation响应规则
Vuex的store中的state是响应式的,当state中的数据发生改变时,Vue组件会自动更新。
store中的这些属性都会被加入到响应式系统中,而响应式系统会监听属性的变化,当属性发生变化时,会通知所有界面中用到该属性的地方,让界面发生刷新。
这就要求我们必须遵守一些
Vuex对应的规则: ①提前在
store中初始化好所需的属性(直接使用属性进行添加未初始化的内容,不能正常被监听且加入响应式系统)
state.info['address']='洛杉矶'(不能加入响应式系统)
delete state.info.age(也做不到响应式) 需要使用
Vue.delete(state.info,'age') ②当给
state中打的对象添加新属性时,使用下面的方式: 方式一:使用
Vue.set(state.对象,'属性名','属性值') 方式二:使用新对象给旧对象重新赋值
# 2】具体实现代码
const store=new Vuex.Store({
    state:{
        info:{
            name:'kobe',
            age:40,
            height:1.98
        }
    },
    mutations:{
        updateInfo(state){
            state.info.name='leihao'//可以响应式,因为是初始化化的属性
          	//state.info['address']='成都'//不能响应式
            Vue.set(state.info,'address','成都')//可以响应式
            //delete state.info.age//不能响应式
            Vue.delete(state.info,'age')//可以响应式
        }
    }
})
组件中的使用状态代码
<h2>{{$store.state.info}}</h2>
<button @click="$store.commit('updateInfo')">修改info</button>
# 九、Vuex-mutation的类型常量
- 在
mutation中,我们定义了很多事件类型(也就是其中的方法名称) - 当我们的项目增大时,
Vuex管理的状态越来越多,需要更新状态的情况越来越多,那么意味着Mutation中的方法越来越多 - 方法越多,使用者需要花费大量的精力去记住这些方法,甚至多个文件间来回切换,查看方法名称,甚至如果不是复制的时候,可能还会出现写错的情况
1】新建一个mutation-types.js文件进行管理事件类型
export const INCREMENT = 'increment'
export const 公共事件名 = '事件名'
2】在index.js和使用vuex管理的组件中都导入这些需要使用的常量
import {INCREMENT} from './mutation-tpyes.js'
...
//需要时使用{},因为这里并没有使用default的方式导出
import * as types from './mutation-tpyes.js'
[types.INCREMENT](state){

}
# 十、Vuex-actions的使用详解
VueComponents ----dispatch---->Actions ----commit---->Mutations ----mutate---->state
# 1】Vuex-mutation同步函数
通常情况下,Vuex要求我们Mutation中的方法必须是同步方法
- 主要的原因是当我们使用
devtools时,可以让devtools帮助我们捕捉mutation的快照 - 但是如果是异步操作,那么
devtools将不能很好地追踪这个操作什么时候会被完成,在devtools工具中不能被记录下来
# 2】Action的基本定义
我们强调,不要在Mutation中进行异步操作
- 但是某些情况,我们确实希望在
Vuex中进行一些异步操作,比如网络请求等操作 Action类似于Mutation,但是是用来代替Mutation进行异步操作的
# 3】具体代码实现
const store=new Vuex.Store({
    state:{
        info:{
            name:'kobe',
            age:40,
            height:1.98
        }
    },
    mutations:{
        updateInfo(state){
            //如果直接在mutation中异步操作无法使用devtools工具
            // setTimeout(()=>{
            //     state.info.name='leihao'
            // },1000)

            state.info.name='hhhh'

        }
    },
    actions:{	  //context:上下文
        aUpdateInfo(context,payload){
           //也可以像Mutations一样携带参数payload
            setTimeout(()=>{
                context.commit('updateInfo')
            },1000)
            console.log(payload)
        }
    }
})
在vue组件中的用dispatch使用Action(也可以像mutation中的commit一样携带payload参数)
<h2>{{$store.state.info}}</h2>
<button @click="$store.dispatch('aUpdateInfo',{returnInfo:'成功'})">异步修改</button>
# 4】使用 mapActions 辅助函数
你在组件中使用 this.$store.dispatch('xxx') 分发 action,或者使用 mapActions 辅助函数将组件的 methods 映射为 store.dispatch 调用(需要先在根节点注入 store):
import { mapActions } from 'vuex'

export default {
  // ...
  methods: {
    ...mapActions([
      'increment', // 将 `this.increment()` 映射为 `this.$store.dispatch('increment')`

      // `mapActions` 也支持载荷:
      'incrementBy' // 将 `this.incrementBy(amount)` 映射为 `this.$store.dispatch('incrementBy', amount)`
    ]),
    ...mapActions({
      add: 'increment' // 将 `this.add()` 映射为 `this.$store.dispatch('increment')`
    })
  }
}
# 十一、Vuex-modules的使用详解
# 1】认识module
Vuex使用单一状态树,那么也意味着很多状态都会交给Vuex来管理- 当应用变得非常复杂时,
store对象就有可能变得相当臃肿 - 为了解决这个问题,
Vuex允许我们将store分割成模块(module),而每个模块分别拥有自己的state、mutations、Actions、getters等
# 2】具体实现代码
①
注意:需要在`vue`组件中使用模块中的`state`很特别,需要`{{$store.state.moduleA.name}}` 实质上是在`store`的`modules`中的各种模块,都被放在了根`state`中,可以直接在根`state`中使用各个模块的`state`
②模块中的getters中的方法也多了第三个参数(这个参数是指向根state)
③Actions中的方法的唯一参数context,也和‘根store中’的不太一样(通过console.log(context)可查看)
const moduleA={
    state:{
        name:'zhangsan'
    },
    mutations:{
        updateName(state,payload){
            state.name=payload
        }
    },
    getters:{
        //getters中属性有三个参数可选:
        //参数一是state(必选),指向当前的模块中的state
        //参数二是getters(可选),指向当前getters
        //参数三是rootState(可选),指向根state
        fullName(state){
            return state.name+'11111'
        },
        fullName2(state,getters){
            return getters.fullName+'222'
        },
        fullName3(state,getters,rootState){
            return getters.fullName2+rootState.counter
        }
    },
    actions:{
        aUpdateName(context){
            //只能commit当前的mutation中的同步方法
            console.log(context)//可以获取当前模块和根的一些状态信息
            setTimeout(()=>{
                context.commit('updateName','wangwu')
            },1000)
        }
    }

}
//2.创建tore对象
const store=new Vuex.Store({
    state:{},
    actions:{},
    getters:{},
    modules:{
        moduleA//es6的同名语法
    }
})
vue组件中使用的代码
<h2>{{$store.state.moduleA.name}}</h2>
<button @click="$store.commit('updateName','lisi')">模块修改name</button>
<h2>{{$store.getters.fullName}}</h2>
<h2>{{$store.getters.fullName2}}</h2>
<h2>{{$store.getters.fullName3}}</h2>
<button @click="$store.dispatch('aUpdateName')">模块异步修改name</button>
# 十二、Vuex-store文件夹的目录组织
store
  |------index.js		//这里面只保留state内容,其他的全部抽离,用es6语法导入
  |------actions.js		//根级别的action
  |------mutations.js  	//根级别的mutation
  |------getters.js
  |------modules
  		    |------cart.js		//购物车模块
  		    |------product.js	//产品模块
  		    		 .
  		    		 .
  		    		 .
